Computer Vision and NLP on OCR text extraction (Supervised ML)
A few days ago, I began exploring Machine Learning and its practical applications. During this journey, a conversation with friends brought up the question of how to extract text from images, specifically to read and extract important parts of a pay stub. This got me thinking; while I didn’t have the answer immediately, I realized that this challenge could be effectively addressed using Artificial Intelligence, particularly Machine Learning.
Working on this project helped me gain practical insights into Machine Learning and how to implement and train a supervised model. In this article, I will briefly describe the steps leading to the conclusion.
This article provides a general overview and is not intended as a step-by-step guide. Its purpose is to offer a broad perspective on the process, highlighting key concepts and considerations without delving into detailed code instructions.
Let’s dive into the proof of concept.
The project: NLP PSR
The NLP Pay Slip Reader is a proof of concept (POC) designed to develop an automated system for extracting key information from slips (pay stubs). The web app allows users to upload their payment slips, automatically detect and extract relevant entities, and visualize the data. The project utilizes various techniques, including optical character recognition (OCR), named entity recognition (NER), and image processing to achieve its objectives.
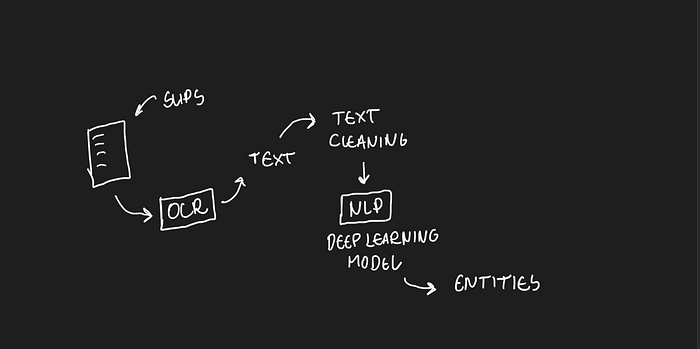
The solution utilizes Computer Vision to scan the slips, identify the text’s location, and extract it from the image. In Natural Language Processing, the solution extracts entities from the text, performs necessary text cleaning, and parses the information.
Data Preparation
The initial step in the process is to extract text from images using Optical Character Recognition (OCR). This technology enables us to convert text within images into a machine-readable format, facilitating subsequent data processing and analysis.
To accomplish this, we can utilize PyTesseract.
PyTesseract is a popular Optical Character Recognition (OCR) tool for Python, based on Google’s Tesseract-OCR engine. It allows developers to extract text from images, making it possible to convert scanned documents, images, or screenshots containing text into machine-readable text data.
import numpy as np
import pandas as pd
import cv2
import PIL
import pytesseract

# Loading using cv2

img_cv = cv2.imread('./images/Slip.png')

### Extract Text from Image from cv2

text_cv = pytesseract.image_to_string(img_cv)
PyTesseract operates through a system of hierarchies and levels to detect data related to the page, blocks, paragraphs, lines, and words. By examining the results in `text_cv`, we can find the texts extracted from the images.
Once the text is extracted from the images, we perform basic cleaning procedures to prepare the data for entity extraction. This may involve removing unwanted characters, correcting errors, or standardizing formats. Following the cleaning process, we organize the extracted text by saving all the words or tokens in a CSV (Comma-Separated Values) file. Each word or token is linked to the corresponding filename, allowing us to maintain the connection between the extracted text and its source slip.
import numpy as np
import pandas as pd
import pytesseract
import cv2
import os

from glob import glob
from tqdm import tqdm
import warnings

warnings.filterwarnings('ignore')

imPaths = glob('./images/*.png')

allSlips = pd.DataFrame(columns=['id','text'])

for imgPath in tqdm(imPaths,desc='Slips'):

    imgPath = imPaths[0]
    #print(imgPath)

    #extract filename
    _, filename = os.path.split(imgPath)

    #extract data and text
    image = cv2.imread(imgPath)
    data = pytesseract.image_to_data(image)

    #dataframe
    dataList = list(map(lambda x: x.split('\t'),data.split('\n')))
    df = pd.DataFrame(dataList[1:],columns=dataList[0])
    df.dropna(inplace=True)


    useFulData = df#.query('conf >= 30')

    #dataframe
    slip = pd.DataFrame()
    slip['text'] = useFulData['text']
    slip['id'] = filename

    #Concatenation
    allSlips =pd.concat((allSlips,slip))

allSlips.to_csv('slips.csv',index=False)
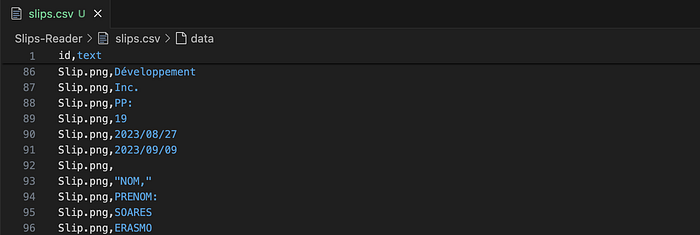
The above code should generate a long DataFrame that will be exported as a CSV like:
Manual Labelling with BIO Tagging
After the text extraction, the subsequent step involves labeling, which is a process commonly used in supervised machine learning. This step entails identifying and marking the relevant entities within the text, such as names, dates, organizations, etc. Labeling plays a critical role in training machine learning models to accurately recognize and categorize these entities.
BIO stands for Beginning, Inside, and Outside (of a text segment). In a system that recognizes entity boundaries, only three labels are used: B, I, and O. The labeling technique is a crucial part of constructing our ground truth, which refers to the accurate and reliable set of data or information used as a benchmark to validate and train models. In this manual process, the information in the DataFrame will be marked with B, I, or O. This is a costly but essential step that will determine the success of the machine learning model. The more diverse information in the DataFrame, such as texts read from different slips with varying formats and positions, the better the results.
The labeling process is extensive. In the example below, I have the following texts in the CSV:

In the context of the process, `slip.png` corresponds to the name of the image file, and subsequently, each portion of extracted text. Considering that the company name is a crucial part of the entity I want to build, I need to locate all the texts in the CSV that represent the organization’s name and tag them accordingly. Here, the TAG `ORG` is utilized. `O` is used for texts that do not represent anything relevant and can be discarded. `B` indicates the beginning of a piece of information; in this example, “Cofomo” is the start of the organization’s name, while “Developpement” is in the middle or at the end. In this case, the tags `I` or `I-ORG` are used, so [B-ORG, I-ORG, I-ORG] corresponds to [Cofomo Development Inc.].
Text Cleaning and Preprocess
After labeling, the extracted text undergoes a cleaning process. This involves removing any unnecessary characters, correcting errors, and standardizing formats to ensure the text is consistent and usable. Clean text is essential for achieving high-quality results in subsequent analytical steps.
During the cleaning stage, it’s necessary to convert the data into a specific format for training the NER model. For this purpose, Spacy can be used.
spaCy is a free, open-source library for advanced Natural Language Processing(NLP) in Python. spaCy is designed specifically for production use and helps you build applications that process and “understand” large volumes of text. It can be used to build information extraction or natural language understanding systems, or to pre-process text for deep learning.
The format expected by Spacy consists a dictionary containing the information of the tags that were manually mapped in the previous stage of the POC. Additionally, it includes the start and end positions of each tag.

The code below demonstrates the conversion of the CSV data into the format illustrated above: start, end, and tag. In this instance, the file ‘slips-tag.txt’ contains all the slips that have been tagged.
import numpy as np
import pandas as pd
import string
import re

# Data Preparation
with open('slips-tag.txt',mode='r',encoding='utf8',errors='ignore') as f:
    text = f.read()

data = list(map(lambda x:x.split('\t'),text.split('\n')))

# Load Data and convert into Pandas DataFrame
df = pd.DataFrame(data[1:],columns=data[0])

df.head()

# See whitespaces
# string.whitespace
# string.punctuation

whitespace = string.whitespace
punctuation = "!#$%&\'()*+:;<=>?[\\]^`{|}~"
tableWhitespace = str.maketrans('','',whitespace)
tablePunctuation = str.maketrans('','',punctuation)
def cleanText(txt):
    text = str(txt)
    text = text.lower()
    removewhitespace = text.translate(tableWhitespace)
    removepunctuation = removewhitespace.translate(tablePunctuation)

    return str(removepunctuation)

df['text'] = df['text'].apply(cleanText)

dataClean = df.query("text != '' ")
dataClean.dropna(inplace=True)
dataClean.head(10)

# Convert Data into spacy format
group = dataClean.groupby(by='id')

# group.groups.keys()
grouparray = group.get_group('Slip.png')[['text','tag']].values
content = ''
annotations = {'entities':[]}
start = 0
end = 0
for text, label in grouparray:
    text = str(text)
    stringLenght = len(text) + 1

    start = end
    end = start + stringLenght

    if label != 'O':
        annot = (start,end -1 ,label)
        annotations['entities'].append(annot)

    content = content + text + ' '

slips = group.groups.keys()

allSlips = []
for slip in slips:
    slipData = []
    grouparray = group.get_group(slip)[['text','tag']].values
    content = ''
    annotations = {'entities':[]}
    start = 0
    end = 0
    for text, label in grouparray:
        text = str(text)
        stringLength = len(text) + 1

        start = end
        end = start + stringLength

        if label != 'O':
            annot = (start,end-1,label)
            annotations['entities'].append(annot)

        content = content + text + ' '


  slipData = (content,annotations)
  allSlips.append(slipData)

# SpacyData
allSlips
Split the Data into Training and Testing Set
Here, the data is randomized and divided into a training and testing set. Splitting data into these sets is a fundamental practice in machine learning for several reasons. By training the model on one subset of the data (the training set) and testing it on another subset (the testing set), you can assess how well the model generalizes to new, unseen examples.
For this POC, the training and testing data will be stored in a pickle file. The pickle module implements binary protocols for serializing and de-serializing a Python object structure.
# Spliting Data into Training and Testing Set
import random

random.shuffle(allSlips)
len(allSlips)

TrainData = allSlips[:240]
TestData = allSlips[240:]

# Save data
import pickle

pickle.dump(TrainData,open('./data/TrainData.pickle',mode='wb'))
pickle.dump(TestData,open('./data/TestData.pickle',mode='wb'))
Training the Named Entity Recognition Model
To train the NER model, you can utilize spaCy and load it with the pickle file generated during the preprocessing stage. The spaCy documentation offers a thorough, step-by-step guide on configuring the tool, including setup for specific scenarios and installation instructions. In the project’s GitHub repository, I have versioned the previously trained model within the output folder, which you can check at the end of this article. SpaCy also provides pre-trained models that are ready for use in your project. Detailed instructions can be found in the “Training Models” section of the spaCy documentation.
One of the first steps is to download the base_config.cfg file, which contains the basic configuration for spaCy. For this POC, the NER component and the English language have been selected, as the slips are in English.

Next, copy the file to your project’s root directory and execute the following command to generate the “complete” configuration file, which in this case is named config.cfg:

Prepare the Data for training
Training data for NLP projects can arrive in various formats. The spaCy documentation includes a section that explains the model configuration and training process. In essence, you must furnish spaCy with the training and testing data, which, in our scenario, are the two pickle files generated during the preprocessing stage. Subsequently, these pickle files will be converted to the spaCy format.
import spacy
from spacy.tokens import DocBin
import pickle

nlp = spacy.blank("en")

# Load Data
training_data = pickle.load(open('./data/TrainData.pickle','rb'))
testing_data = pickle.load(open('./data/TestData.pickle','rb'))


# the DocBin will store the example documents
db = DocBin()
for text, annotations in training_data:
    doc = nlp(text)
    ents = []
    for start, end, label in annotations['entities']:
        span = doc.char_span(start, end, label=label)
        ents.append(span)
    doc.ents = ents
    db.add(doc)
db.to_disk("./data/train.spacy")


# the DocBin will store the example documents
db_test = DocBin()
for text, annotations in testing_data:
    doc = nlp(text)
    ents = []
    for start, end, label in annotations['entities']:
        span = doc.char_span(start, end, label=label)
        ents.append(span)
    doc.ents = ents
    db_test.add(doc)
db_test.to_disk("./data/test.spacy")
The model is trained using the following command:
python -m spacy train .\config.cfg --output .\output --paths.train .\data\train.spacy --paths.dev .\data\test.spacyAfter training, two folders are created: “model-best,” which contains the most accurate model, and “model-last,” which contains the model from the latest training iteration.
Predictions
The final step involves training a Named Entity Recognition (NER) model. Using the cleaned and labeled text, the NER model learns to identify and classify various entities within the text. This training process involves feeding the model a large dataset and iteratively improving its accuracy through supervised learning techniques. The trained NER model can then be used to automatically recognize and extract entities from new text data.
Consider a scenario where one of the pay stub contains the following texts. The confidential information has been blurred for privacy; please disregard it:

Given that the entity “Slip” includes gains and deductions as parameters, the model, after analyzing the extracted text from the image, should accurately detect the values of each information and populate them in our entity, as demonstrated in the example below:

In this phase, there are four steps to follow to obtain predictions from the NER model:
1. Load the image.
2. Extract data using Pytesseract.
3. Convert data into content.
4. Obtain predictions.
import numpy as np
import pandas as pd
import cv2
import pytesseract
from glob import glob
import spacy
import re
import string
import warnings

def cleanText(txt):
    whitespace = string.whitespace
    punctuation = "!#$%&\'()*+:;<=>?[\\]^`{|}~"
    tableWhitespace = str.maketrans('','',whitespace)
    tablePunctuation = str.maketrans('','',punctuation)
    text = str(txt)
    text = text.lower()
    removewhitespace = text.translate(tableWhitespace)
    removepunctuation = removewhitespace.translate(tablePunctuation)

    return str(removepunctuation)


warnings.filterwarnings('ignore')

### Load NER model
model_ner = spacy.load('./output/model-best/')

# Load Image
image = cv2.imread('./Selected/Slip.png')


# extract data using Pytesseract
tessData = pytesseract.image_to_data(image)

# convert into dataframe
tessList = list(map(lambda x:x.split('\t'), tessData.split('\n')))
df = pd.DataFrame(tessList[1:],columns=tessList[0])
df.dropna(inplace=True) # drop missing values
df['text'] = df['text'].apply(cleanText)

# convet data into content
df_clean = df.query('text != "" ')
content = " ".join([w for w in df_clean['text']])
print(content)

# get prediction from NER model
doc = model_ner(content)
In spaCy, a “doc” (short for “document”) refers to a container for accessing linguistic annotations and a sequence of tokens. The Doc object holds the processed text along with its annotations.
The code snippet below initializes a server where it is possible to view the prediction:
from spacy import displacy

displacy.serve(doc,style='ent',port=5001)
Here is the result. The confidential information has been blurred in the example for privacy, but we have extracted all the text from a new pay slip. When a tag mapped during the labeling process is identified, it is displayed accordingly. For example, following the text “compagnie,” which represents the company’s name, it was automatically mapped to the tag B-ORG. The same process was applied to all other relevant information in the text, such as names, salaries, gains, deductions, etc.

It is possible to work with the “Doc” variable, which contains the annotation information and token sequences returned by the model. The code below converts the `Doc` object into JSON to transform it into a DataFrame containing all the necessary information to create bounding boxes on the image at the positions where the information was found.
Next, an entity dictionary is created, along with a parsing function to process each piece of text found.
#!/usr/bin/env python
# coding: utf-8

import numpy as np
import pandas as pd
import cv2
import pytesseract
from glob import glob
import spacy
import re
import string
import warnings
warnings.filterwarnings('ignore')

### Load NER model
model_ner = spacy.load('./output/model-best/')


def cleanText(txt):
    whitespace = string.whitespace
    punctuation = "!#$%&\'()*+:;<=>?[\\]^`{|}~"
    tableWhitespace = str.maketrans('','',whitespace)
    tablePunctuation = str.maketrans('','',punctuation)
    text = str(txt)

    removewhitespace = text.translate(tableWhitespace)
    removepunctuation = removewhitespace.translate(tablePunctuation)

    return str(removepunctuation)

# group the label
class groupgen():
    def __init__(self):
        self.id = 0
        self.text = ''

    def getgroup(self,text):
        if self.text == text:
            return self.id
        else:
            self.id +=1
            self.text = text
            return self.id


def parser(text,label):
    if label in ('NAME'):
        text = text.lower()
        text = re.sub(r'[^a-z ]','',text)
        text = text.title()

    elif label in ('ORG','ROLE'):
        text = text.lower()
        text = re.sub(r'[^a-z0-9 ]','',text)
        text = text.title()

    elif label in ('DATE'):
        text = text.lower()
        text = re.sub(r'[^0-9/]','',text)
        text = text.title()

    elif label in ('BASE','HOURS','QTD','GAINS','DEDUCTIONS','NETTE'):
        text = text.lower()
        text = re.sub(r'[^0-9.,]','',text)
        text = text.title()

    return text

grp_gen = groupgen()

def getPredictions(image):
    try:
        # extract data using Pytesseract
        tessData = pytesseract.image_to_data(image)

        # convert into dataframe
        tessList = list(map(lambda x:x.split('\t'), tessData.split('\n')))
        df = pd.DataFrame(tessList[1:],columns=tessList[0])
        df.dropna(inplace=True) # drop missing values
        df['text'] = df['text'].apply(cleanText)

        # convet data into content
        df_clean = df.query('text != "" ')
        content = " ".join([w for w in df_clean['text']])


        # get prediction from NER model (doc file)
        doc = model_ner(content)

        # converting doc in json
        docjson = doc.to_json()
        doc_text = docjson['text']

        # creating tokens
        datafram_tokens = pd.DataFrame(docjson['tokens'])
        datafram_tokens['token'] = datafram_tokens[['start','end']].apply(
            lambda x:doc_text[x[0]:x[1]] , axis = 1)

        right_table = pd.DataFrame(docjson['ents'])[['start','label']]
        datafram_tokens = pd.merge(datafram_tokens,right_table,how='left',on='start')
        datafram_tokens.fillna('O',inplace=True)

        # join lable to df_clean dataframe
        df_clean['end'] = df_clean['text'].apply(lambda x: len(x)+1).cumsum() - 1
        df_clean['start'] = df_clean[['text','end']].apply(lambda x: x[1] - len(x[0]),axis=1)

        # inner join with start
        dataframe_info = pd.merge(df_clean,datafram_tokens[['start','token','label']],how='inner',on='start')

        # Bounding Box
        bb_df = dataframe_info.query("label != 'O' ")

        bb_df['label'] = bb_df['label'].apply(lambda x: x[2:])
        bb_df['group'] = bb_df['label'].apply(grp_gen.getgroup)

        # right and bottom of bounding box
        bb_df[['left','top','width','height']] = bb_df[['left','top','width','height']].astype(int)
        bb_df['right'] = bb_df['left'] + bb_df['width']
        bb_df['bottom'] = bb_df['top'] + bb_df['height']

        # tagging: groupby group
        col_group = ['left','top','right','bottom','label','token','group']
        group_tag_img = bb_df[col_group].groupby(by='group')
        img_tagging = group_tag_img.agg({

            'left':min,
            'right':max,
            'top':min,
            'bottom':max,
            'label':np.unique,
            'token':lambda x: " ".join(x)

        })

        img_bb = image.copy()
        for l,r,t,b,label,token in img_tagging.values:
            cv2.rectangle(img_bb,(l,t),(r,b),(0,255,0),2)

            cv2.putText(img_bb,str(label),(l,t),cv2.FONT_HERSHEY_PLAIN,1,(255,0,255),2)


        # Entities
        info_array = dataframe_info[['token','label']].values
        entities = dict(NAME=[],ORG=[],DATE=[],ROLE=[],BASE=[],HOURS=[],QTD=[],GAINS=[],DEDUCTIONS=[],NETTE=[])
        previous = 'O'

        for token, label in info_array:
            bio_tag = label[0]
            label_tag = label[2:]

            # step -1 parse the token
            text = parser(token,label_tag)

            if bio_tag in ('B','I'):

                if previous != label_tag:
                    entities[label_tag].append(text)

                else:
                    if bio_tag == "B":
                        entities[label_tag].append(text)

                    else:
                        if label_tag in ("NAME",'ORG','ROLE'):
                            entities[label_tag][-1] = entities[label_tag][-1] + " " + text

                        else:
                            entities[label_tag][-1] = entities[label_tag][-1] + text


            previous = label_tag

        return img_bb, entities

    except Exception as e:
        print(f"An error occurred, make sure the image contours are correct: {str(e)}")
        return None, None
Conclusion
There are numerous applications for Machine Learning in character detection and recognition and NLP. Another potential proof of concept could entail employing the same technique by using a mobile phone and automatically translating the extracted text into a designated language.
This demonstrates the versatility and practicality of Machine Learning in various contexts.
Hope you like it!
The POC for the NLP Scanner is available on my GitHub.
References
- Vision view & Data Science Anywhere, Intelligently Extract Text & Data from Documents
- Li, J., Lu, Q., & Zhang, B. (2019). An efficient business card recognition system based on OCR and NER. In 2019 International Conference on Robotics, Automation and Artificial Intelligence (RAAI) (pp. 334–338). IEEE.
- Sharma, S., & Sharma, A. (2020). Business Card Recognition using Convolutional Neural Networks. In 2020 5th International Conference on Computing, Communication and Security (ICCCS) (pp. 1–5). IEEE.
- Spacy — Industrial-strength Natural Language Processing in Python. (n.d.). Retrieved from https://spacy.io/
- PyTesseract: Python-tesseract — OCR tool for Python. (n.d.). Retrieved from https://pypi.org/project/pytesseract/
- OpenCV: Open Source Computer Vision Library. (n.d.). Retrieved from https://opencv.org/
- Flask: A Python Microframework. (n.d.). Retrieved from https://flask.palletsprojects.com/


